From sign-up to signed off. All from your phone.
Here’s how works for trades, step by step: what we check, how jobs reach you, how you quote, and what makes a great trade. Most of it takes a couple of minutes, wherever you are.
Register your interest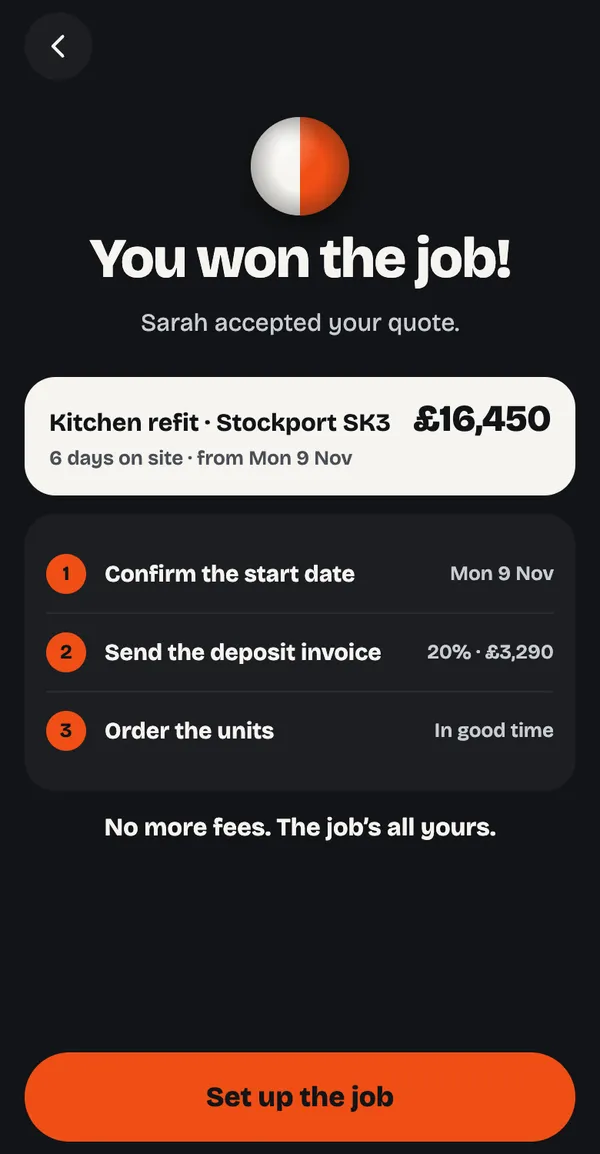
- Step 1
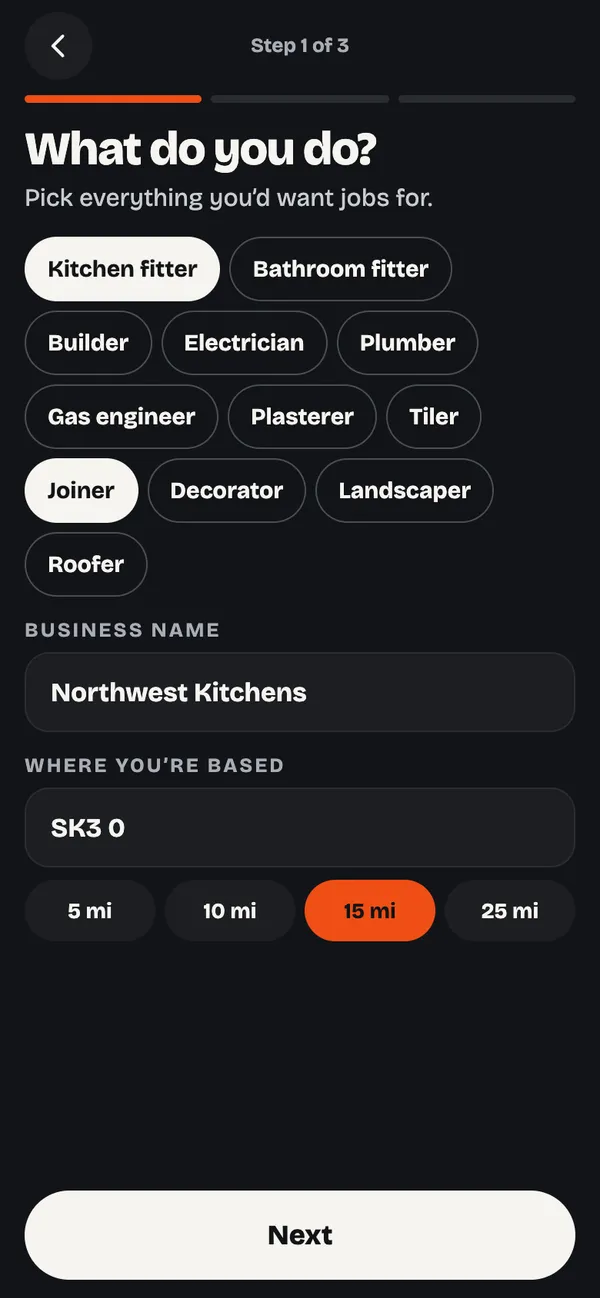
Join in a couple of minutes
Pick the trades you do, add your business name and where you’re based, and say how far you’ll travel. That’s all it takes to start seeing projects near you.
- Free to join
- No monthly subscription
- Step 2
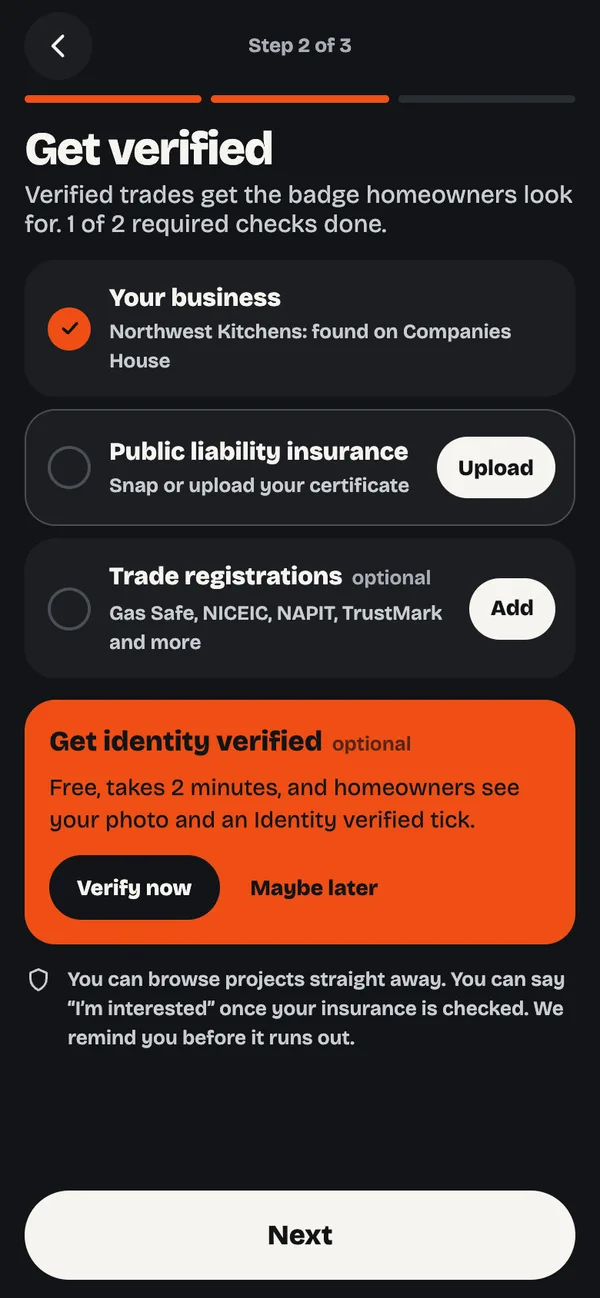
Get verified
Homeowners look for the verified badge, so we check every business before it can say it’s interested in a job. Then go one better and get your identity verified: it’s free, takes a couple of minutes, and puts your photo and an Identity verified tick on your profile.
- Your business, found on Companies House with at least two years’ trading history
- Public liability insurance: snap or upload your certificate
- Trade registrations such as Gas Safe, NICEIC, NAPIT or TrustMark, if your work needs them
- Identity verified (free and optional): your passport or driving licence and a live selfie, checked by Stripe. We never keep your ID.
You can browse projects straight away, and say you’re interested once your checks are done. We remind you before your insurance runs out.
- Step 3
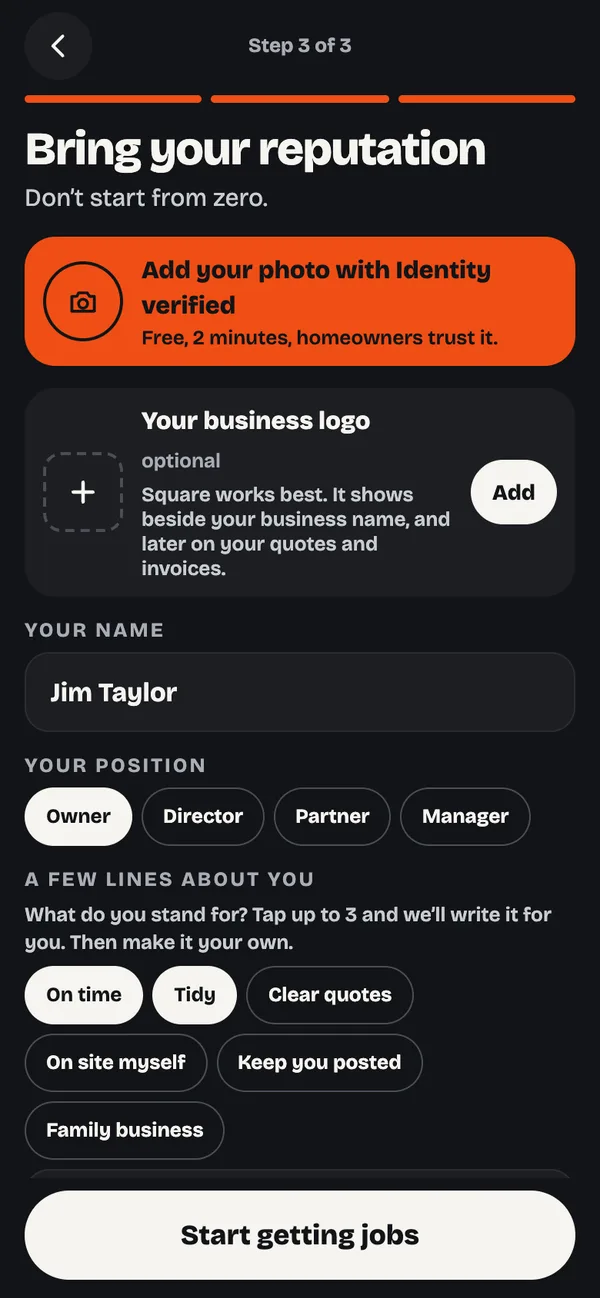
Bring your reputation
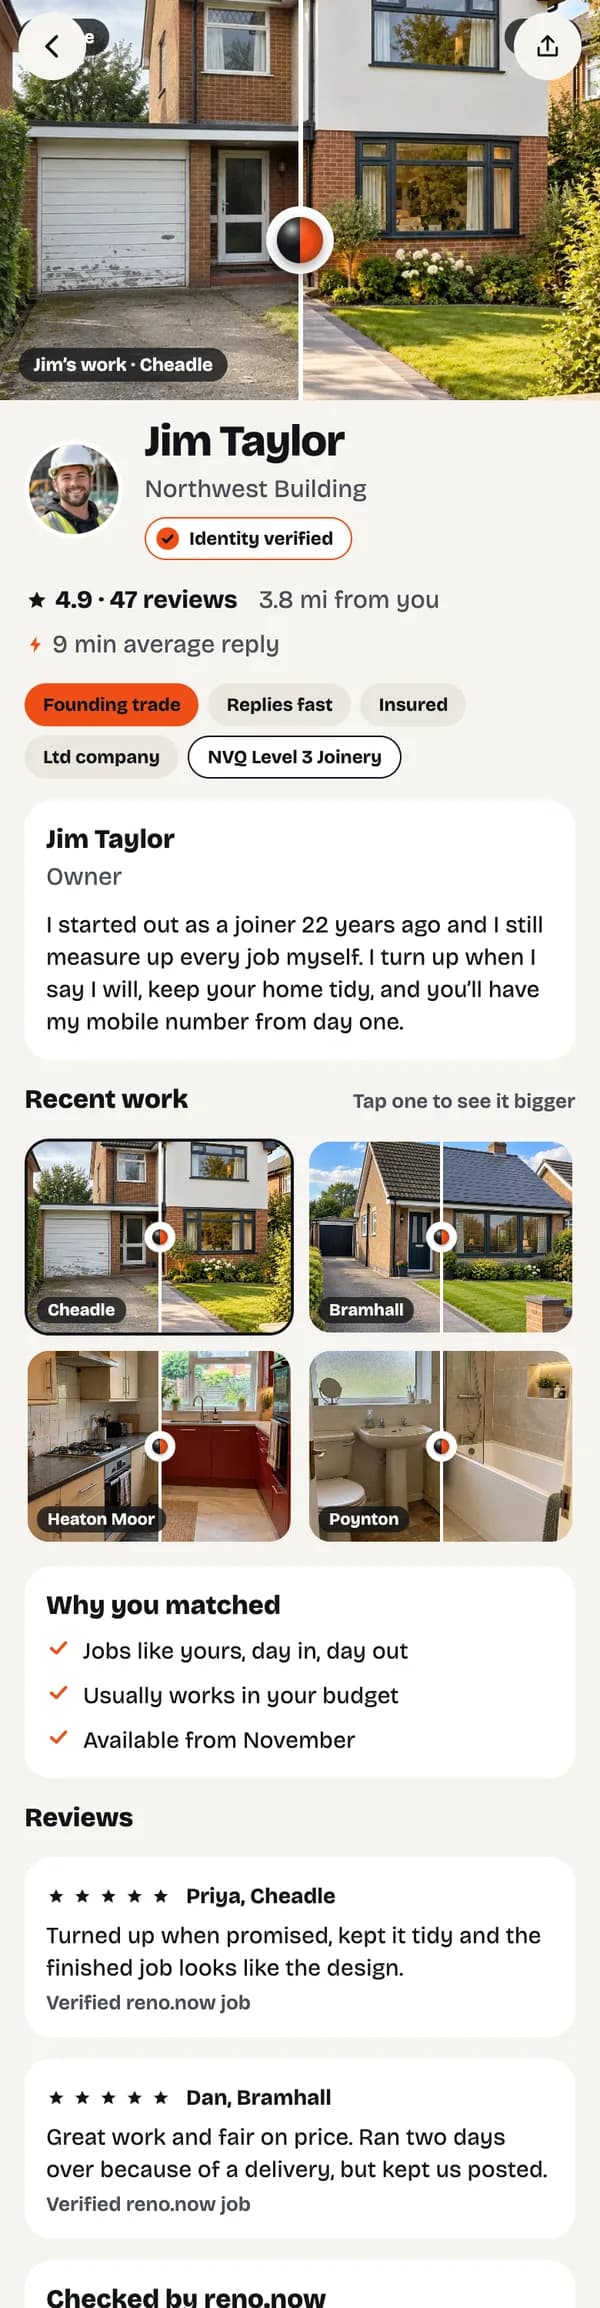
Don’t start from zero. Your profile introduces you as well as your work: your name, your role and a few lines on what you stand for (we’ll help you write it), and once you’re identity verified, your photo, so homeowners know who’s coming round. Add your business logo too: it sits beside your business name. Then invite past customers to review you (with proof of the job, such as an invoice), link your Google profile, and add before and afters of past jobs to start your portfolio.
- Homeowners see who’s coming round
- Past customers’ reviews are marked as past jobs
- Every genuine review shows, good or bad, and you can reply
Your profile does the selling for you.
When a homeowner taps your name, this is what they see: you, not just a business name. Your photo and a few lines on how you work, the checks you’ve passed and how quickly you reply, your reviews, and then job after job of your before and afters.
- Your photo and an Identity verified tick
- Your business checks, qualifications and reply time
- Reviews, then your portfolio of before and afters
- Step 4
Only see jobs that fit
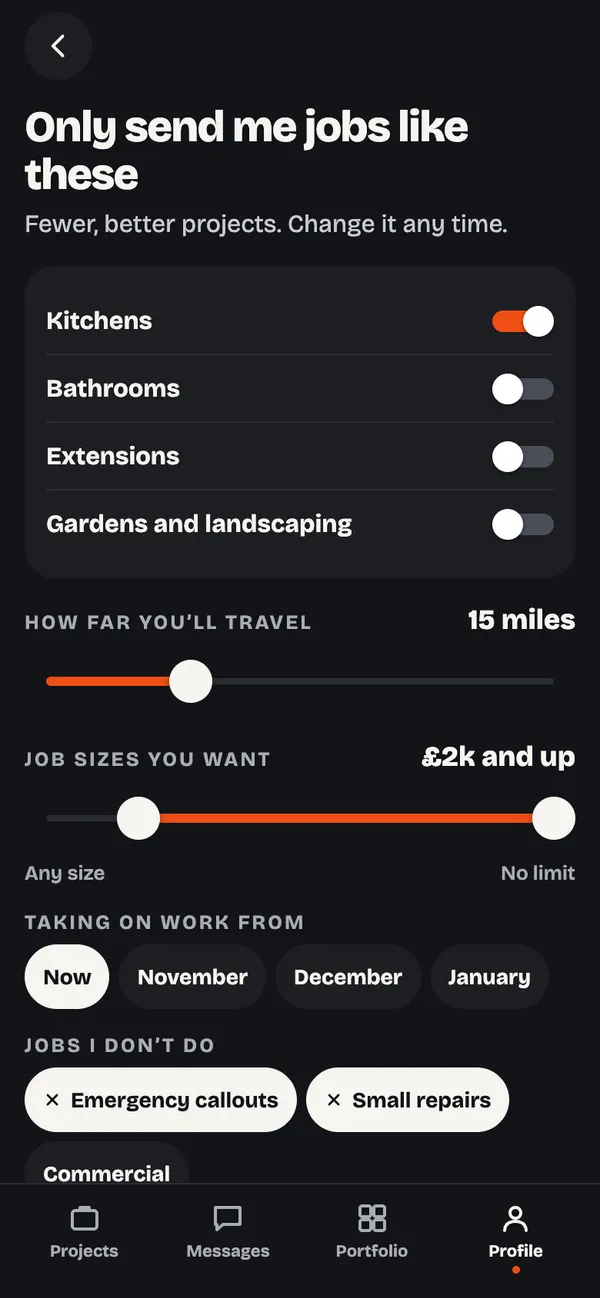
Then fine-tune it: the kinds of job you want, the job sizes you take on, when you’re available and the jobs you don’t do, and change how far you’ll travel any time. You only see projects that fit, so you don’t waste time on the rest.
- Change it any time
- Fewer, better projects
- Step 5
Get notified the moment a job comes in
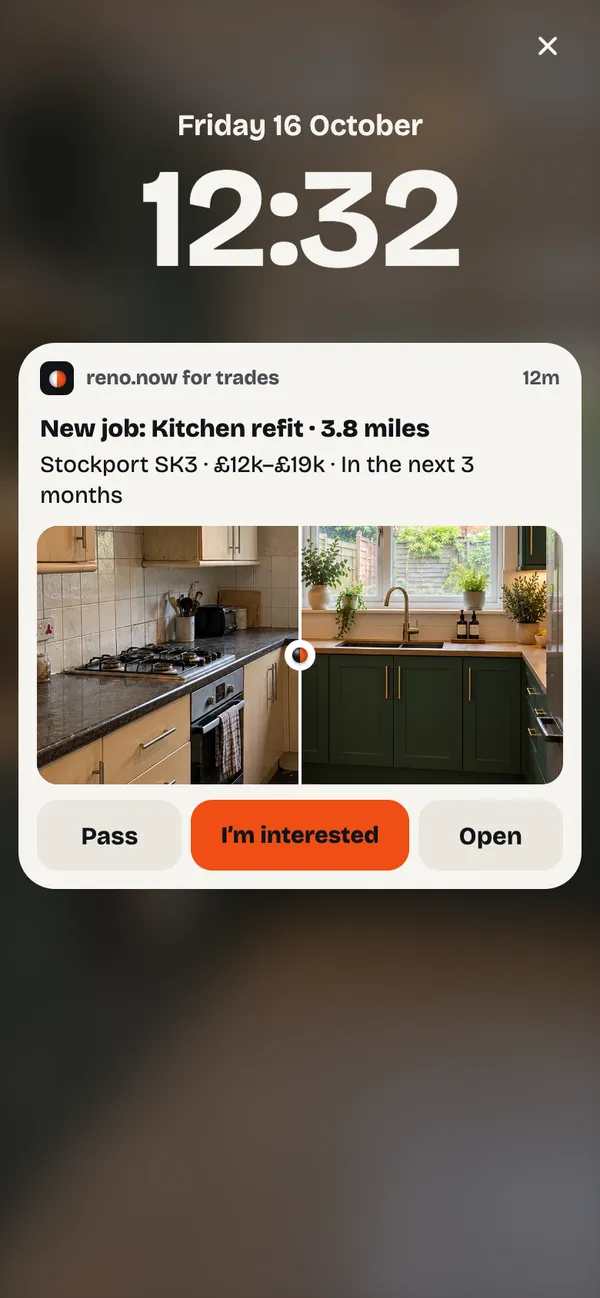
No matter where you are, up a ladder or between jobs, new projects that fit come straight to your phone as they happen: what the job is, where it is, our estimate and when they’d like to start. Tap it to open the job, or find it later in your projects.
- New projects in real time
- Only the ones that fit what you’re after
- Pass or I’m interested, right from the notification
- Step 6
All the jobs that fit, in one place
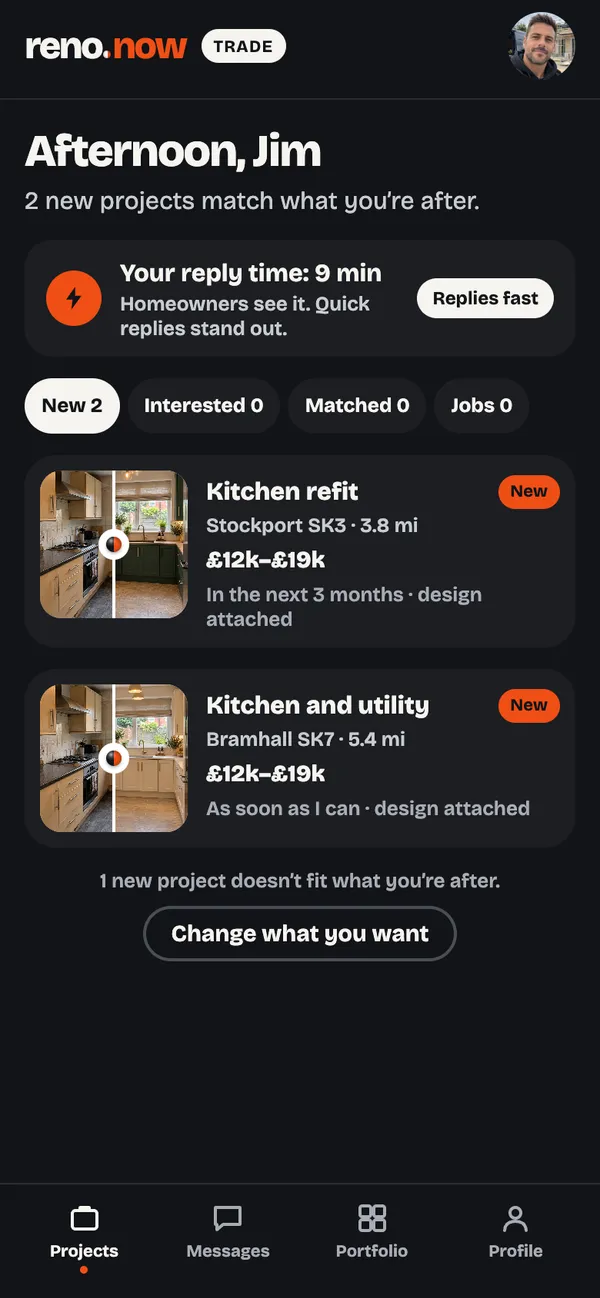
Your projects list shows every new job that matches what you’re after: what it is, where it is, our estimate and when they’d like to start. Missed a notification? It’s waiting here. Your reply time sits at the top, and the jobs you’re interested in, matched on and working on each have their own tab.
- Every new job that fits
- Missed a notification? It’s waiting here
- Your reply time at the top
- Step 7
See the whole scope, then say “I’m interested”
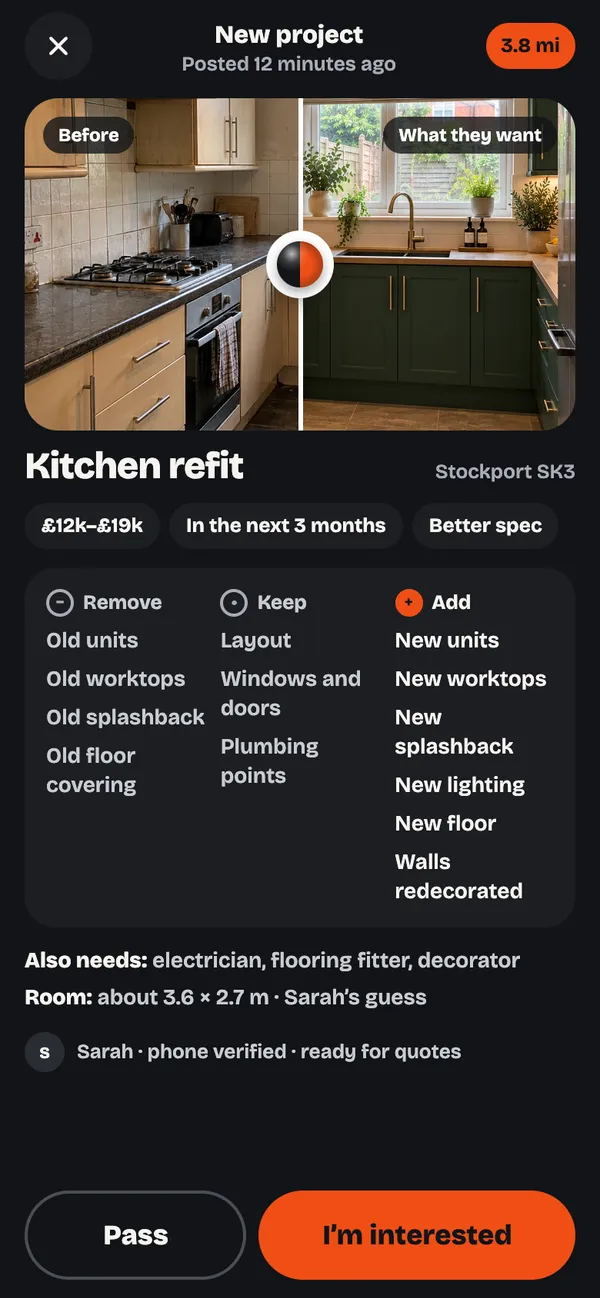
Tap a job to see everything: the homeowner’s photos, the design they picked, our estimate, what’s coming out, what stays and what’s going in, the room size and the other trades it needs. If it suits, tap I’m interested. If not, Pass. Saying you’re interested is free: you only pay if the homeowner picks you too.
- Photos of the space today, and the design they chose
- Our estimate at their budget
- Pass or I’m interested in one tap, free either way
Homeowners are ready now. Be the one who gets back first.
A homeowner is never keener than when they’ve just picked their design and asked to be matched. They choose up to three trades, and if you leave it until tonight, another trade may already have replied, booked the visit and be on their way. The trades who get back first are the ones who get through the door.
- Your reply time is on your profileHomeowners see how quickly you usually get back to them.
- Fast trades rise to the topTrades who get back quickly to the homeowners who pick them are shown higher on the list.
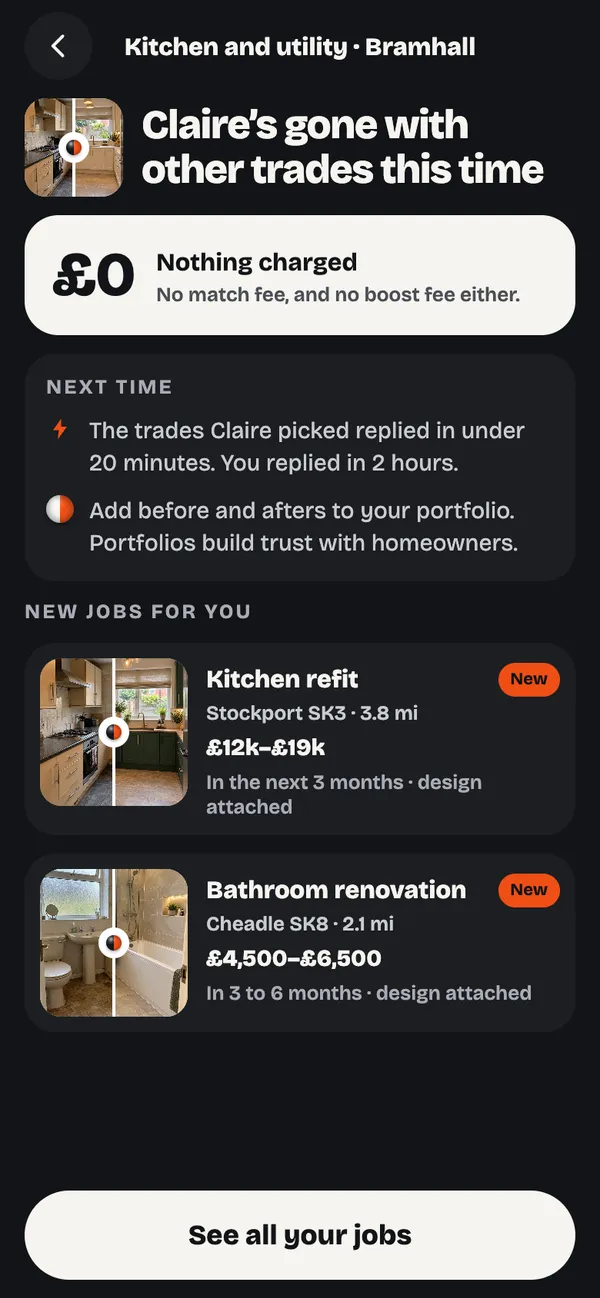
- Not picked? £0, and a tip for next timeWe tell you straight away and you pay nothing. We’ll show you what the picked trades did, like replying in under 20 minutes.
- Step 8
It’s a match: say hello and book the visit
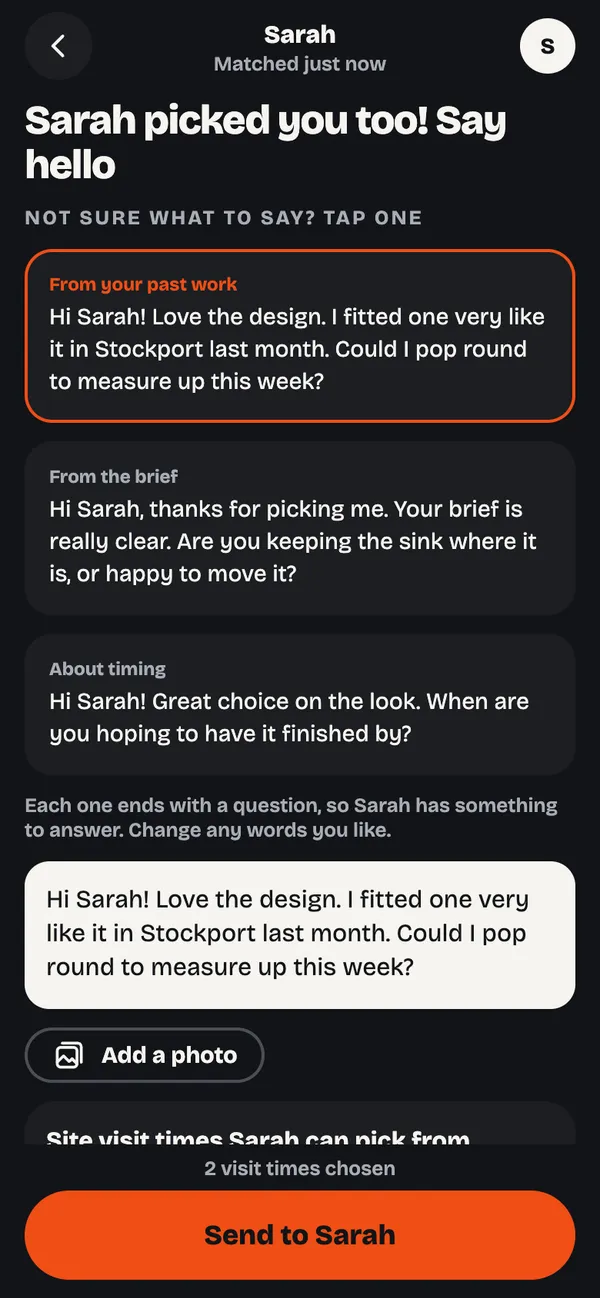
When the homeowner picks you too, it’s a match: your match fee is taken and the chat opens. Say hello with a ready-made opener, then offer up to three visit times that suit you. The homeowner taps one and it’s booked, with a reminder for you both the day before.
- No back and forth over days and times
- Their number stays private until they share it
- Step 9
Quote from the estimate, then make it yours
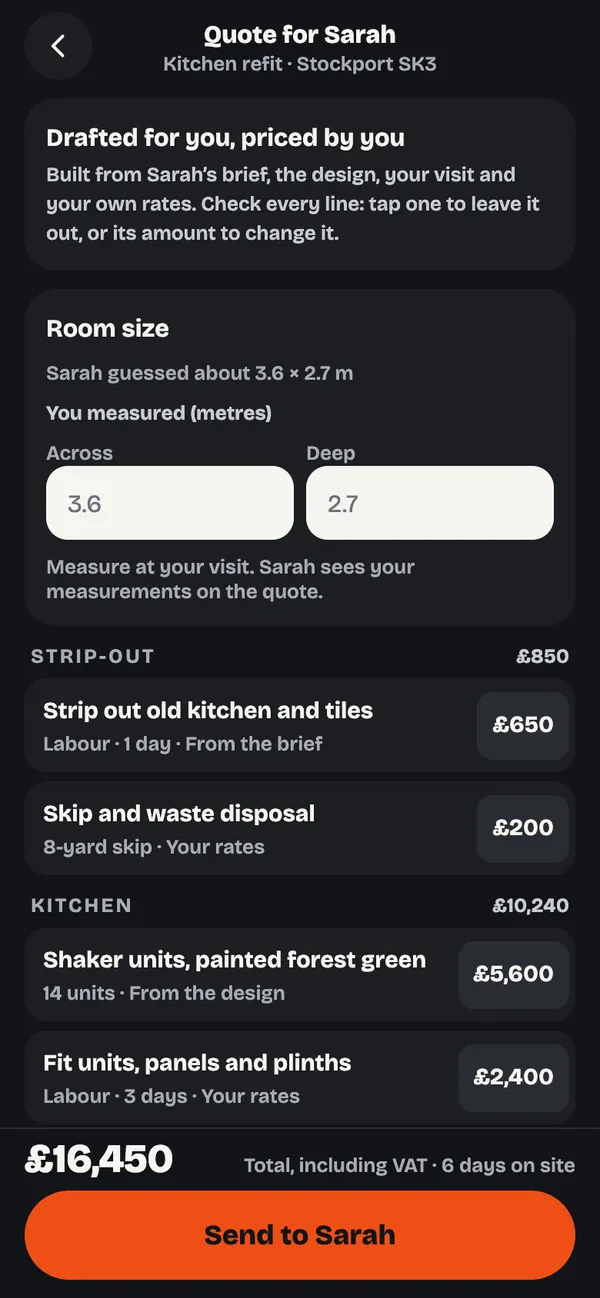
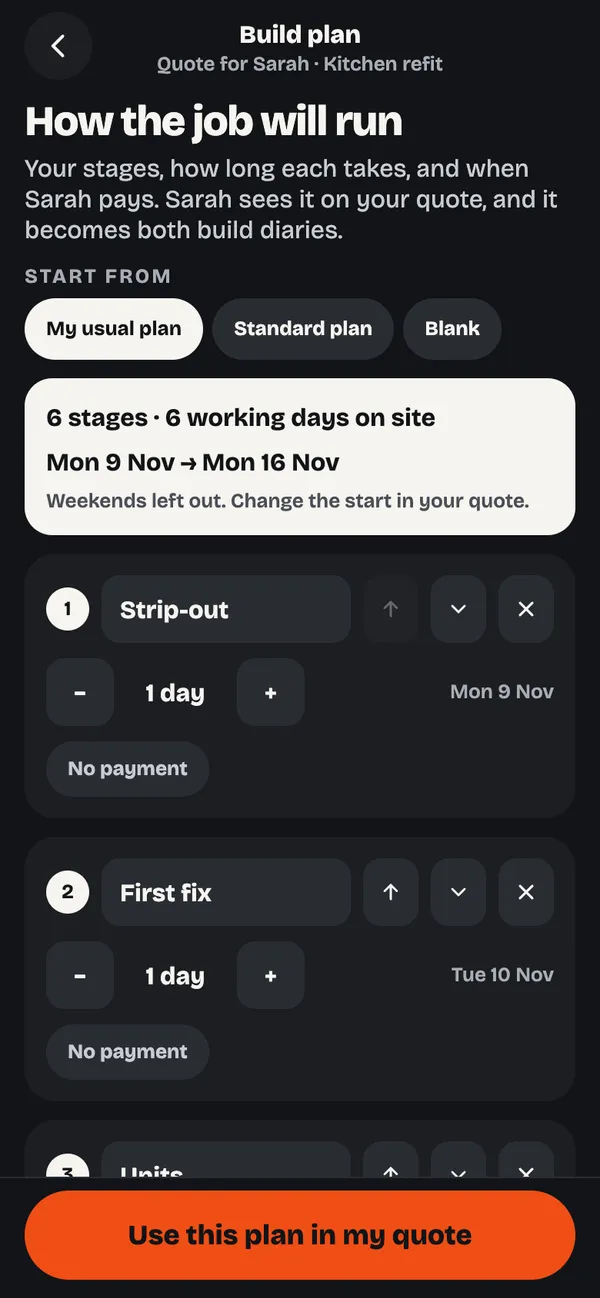
Your quote is drafted for you from the homeowner’s brief, the design and our estimate, at your own rates. After the visit, measure up, leave lines out, change any amount and add your own. Set the stages, the days each takes and when you’re paid, then send it while the visit’s still fresh.
- Drafted line by line, priced by you
- A build plan with stages and payments
- The homeowner sees it next to our estimate
- Step 10
We help sell the job for you
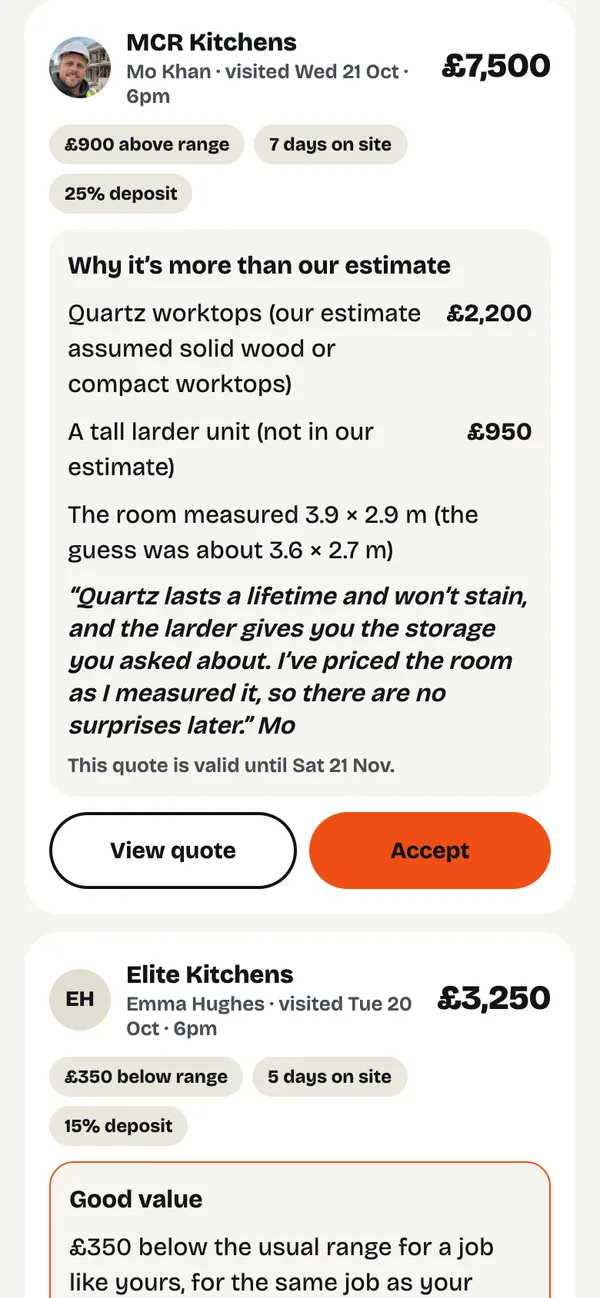
Your quote reaches the homeowner next to our estimate, with the reasons it’s different. If it’s above the estimate, the app shows them what they’re getting for the money, line by line: the better materials, the extras, the room you measured. If it’s below, it shows them it’s good value, and says plainly if your quote leaves something out. Add your own line on why your price is what it is (we draft one for you), and the homeowner sees the real date your quote holds until, never a made-up deadline. A fair price gets explained, not questioned.
- Your quote next to our estimate
- Above it? The reasons, line by line
- Below it? Shown as good value, with the date your price holds
- Your own line on why your price is what it is
- Step 11
Win the job
When the homeowner accepts your quote, the job’s yours. Confirm the start date and send the deposit invoice. There are no more fees, and the homeowner pays you directly, stage by stage. We never hold anyone’s money.
- No more fees after the match
- Paid directly by the homeowner
- Step 12
Keep them posted, build your portfolio
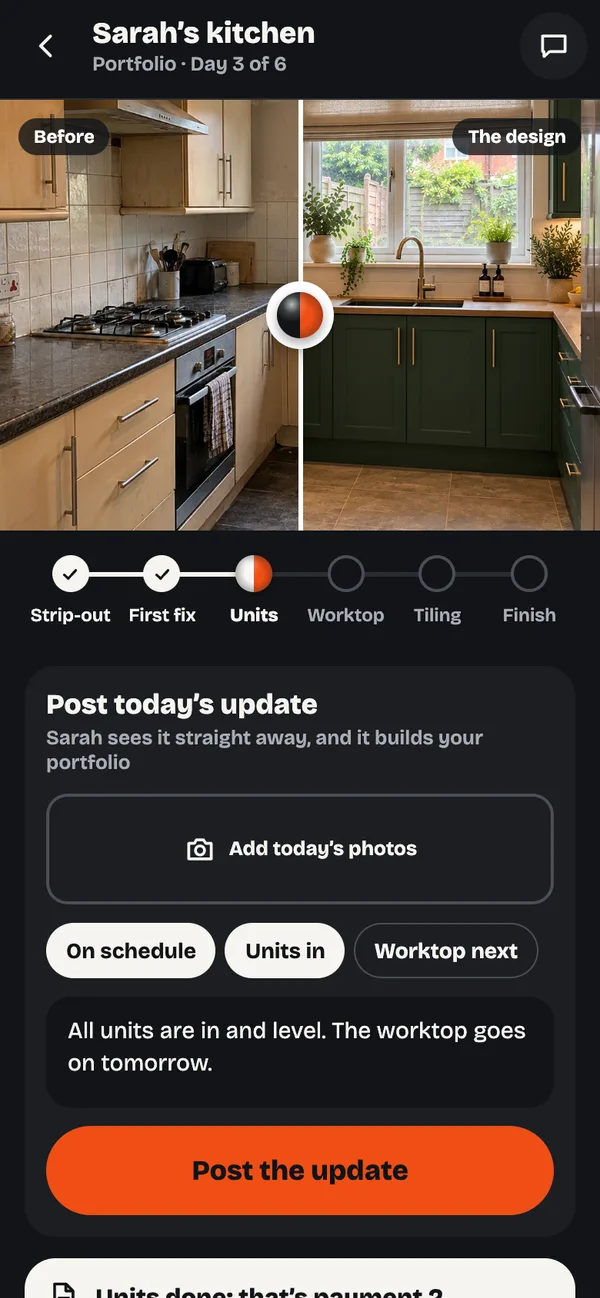
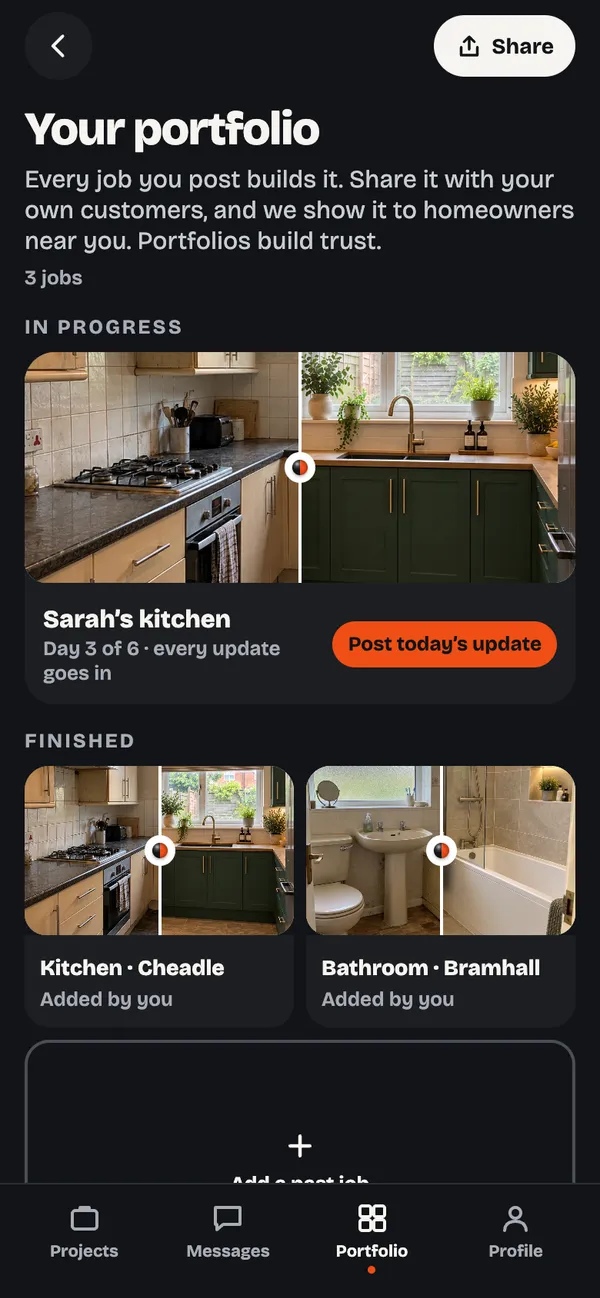
Post a photo and a line each day in the build diary; the homeowner sees it straight away. When the job’s finished, it becomes a before and after in your portfolio (with the homeowner’s OK, town only), ready to share with your own customers and shown to homeowners near you. Then ask for the review.
- A minute a day
- Portfolios build trust
- Reviews marked “Booked through reno.now”
Speed gets you in the door. Standards keep you there.
Get back quickly
Reply from the notification, and offer visit times the same day.
Quote promptly and clearly
Send your quote while the visit’s fresh, with every line explained.
Turn up when you said
The booking and the reminder are in the app. Keep to them.
Keep the diary going
A photo and a line a day. Homeowners love it, and it builds your portfolio.
Do work you’re proud of
Every finished job becomes a before and after with your name on it.
Keep your checks up to date
Insurance and registrations current, so your verified badge stays.
No more evenings lost to enquiries.
No sitting at home at night chasing leads and typing up quotes. It all fits into the gaps in your day, on your phone.
- With your morning brewLook at new projects that fit and tap I’m interested.
- Between jobsReply from the notification and offer visit times.
- After the visitCheck the drafted quote, change what you need and send it.
- At the end of the dayPost today’s photo in the build diary.
Ready for your next job on ?
Register your interest and we’ll be in touch when opens in your area.
Register your interest